EN
EN FR
FR PT
PT AR
ARHow do you drill a hole in ceramic tile without cracking it? When you have completed your tiling and you're happy with the end result you might be dreading the prospect of ruining that good work, you may be not sure what to do because you don’t want to crack a tile when you have to drill the tiles for your bathroom accessories, cabinet, shelves and other fittings. These 6 tips for drilling through tiled walls will help you avoid cracking the tiles when drilling (water cooling stops drilling damaged) and it won't cost a fortune or take very long.
Best Tools To Drill A Hole Into Ceramic Tile
A lot of people get quite scared about drilling through tiles in bathroom, living room or other areas, but it’s actually really simple if you got the right tools at the job:
- Electronic drill
- Dustpan (to catch everything coming out of the hole)
- Little tub (to fill with water that we are going to use to cool the drill)
- Dust mask
- Safety goggles
Step-By-Step Guide On How To Drill Tiles Without Cracking Them
A very quick and easy method showing how to drill a hole into a tile using a diamond-ground tip geometry dill bit. Follow these 6 steps to hang mirrors, cabinets and anything else onto a pre-tiled wall:
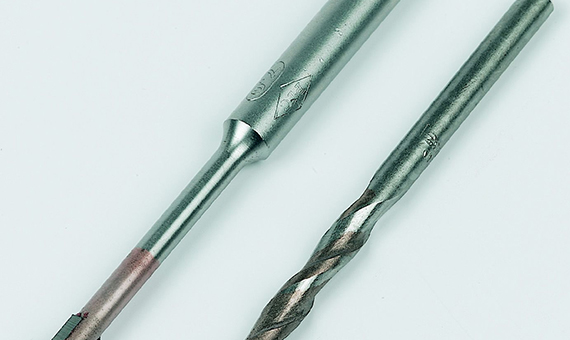
1. Ensure you have the right tile drill bit
There are lots of drill bits on the market that you can use to drill through tiles. They're characterized with a arrow-shaped tip, but the drill bit we will use is the Armeg and it’s just a very good quality drill bit and it comes with the tile drill itself which has an arrow-shaped tip.
And then masonry drill bit as well which is great, because once you've gone through the tile if you keep going into the brickwork behind with your tile drill, you're going to blunt on the drill. So you go through the ceramic tile with this and then you swap to a standard masonry drill bit. Once you know that you're clear of the tile.
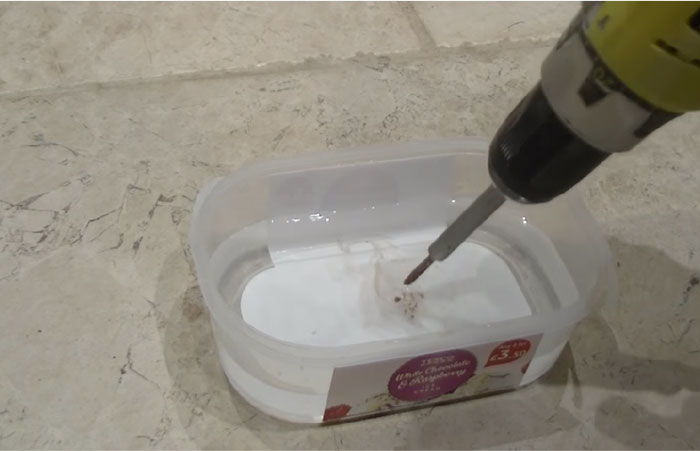
2. Prepare a container of water and start drilling through tiles
You need to use a constant flow of water across the drill bit when you're drilling. You're typically doing this sort of job Corp towards the end of a project and you don't want a lot of water, a lot of mess flowing down the wall. So get a container of water and as you are drilling you are going to just dip the drill bit into the water to keep it cool. So in goes the draw of it, don’t have your drill and hammer action for this don’t try and make a mark or imprint onto the tile. Carefully place the drill bits in the position top and underneath. Then start drilling through the tile.
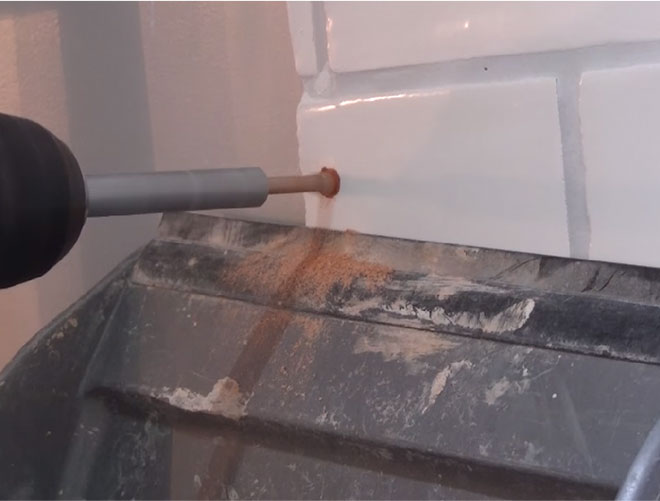
3. Keep your bits cool
After you got the initial imprint, dip the drill bit in the water, just to cool it down and carry on. Once again, we're just going to dip the drill bit in the water, you might hear a little fizz as it cools down. Just apply constant but gentle pressure and dip into the water.
4. Change your drill bit when you hit the wall
You’ve cut through the tile and hit the wall surface without creating any damage. You’re almost there, all you need to do now is bore through the wall and then mount the accents.
Keep drilling slowly to avoid crashing into the wall surface. If the wall is blown apart, your anchor will not hold properly, and the accents will be loose. You might change the drill bit if you feel that the one you’re using is not that effective. The secret, however, is to keep the drill slow and steady and you’ll be able to bore a hole even with a drill bit for tile.
5. Go further into the wall
Then you are through the tile. If you just want to go a little bit further into the wall to take the wall plug in the screw, use the driller that comes with it and we've got a beautiful clean hole. We're going to do one more now just to show that on the flick position the drill bit gently against the tile just move it around a bit and then off we go dip it in the water. And then we have it, another beautiful clean hole.
6. Clean up and attach your accessory
Once you’ve finished drilling, it’s time to clean the tile surface. If you’ve used masking tape rather than a drill guide, remove this and wipe away any dust on the tile using a wet cloth. You can then insert fixing plugs into the holes and attach your accessory.
I hope these ceramic tile drilling tips are useful for you to drill a hole in tile without cracking it. Whether you're drilling into granite, marble, ceramic or softer tiles, the key is to buy a decent drove it and keep it cool by constantly dipping it into water.


 2
2


- 16